
Sample Collection and Transport
1. Pre-collection Preparation
(1) All equipment and the working environment must be sterilized. All instruments (e.g., scissors, forceps) should be pre-chilled on ice.
(2) Place a layer of ice on a tray, cover it with aluminum foil, and then lay several layers of sterile drapes over the foil. Place the specimen on the sterile drapes for sampling. Maintaining a low temperature throughout the entire sampling process helps delay nucleic acid degradation.
(3) Use the specified brand of OCT (Sakura Tissue-Tek 4583 or Leica FSC 22) for embedding. Pre-chill the OCT on ice for 30 minutes prior to use.
2. Plant Sample Collection
(1) Samples from culture media: In a sterile clean bench, remove the tissue and wash away any adhering culture medium with ultrapure water. Excise the fresh target tissue from the living plant and place it in a petri dish. Using forceps and scissors pre-chilled to 4°C, trim away as much non-target tissue as possible. If the tissue contains internal cavities, trim it to expose these cavities whenever feasible.
(2) Soil-grown samples: Carefully extract the intact tissue from the soil and remove any soil and debris. Thoroughly clean the tissue surface with ultrapure water. Excise the fresh target tissue from the living plant and place it in a petri dish. Using forceps and scissors pre-chilled to 4°C, trim away non-target structures. If internal cavities exist, trim the tissue to expose them.
(3) Embed the target tissue according to the embedding method described below.
3. Flash-Freezing and Embedding of Plant Tissues
Method 1: Direct OCT Embedding (No Vacuum Infiltration)
This method is suitable for lateral roots, root tips, leaves, and callus tissues.
1) Immerse the plant tissue in 1 ml of 0.05% Tween 20 on wet ice for 15 minutes.
2) Place the embedding mold on ice and label it (indicating tissue orientation, sample name, etc.). Photographs may be taken for records. Add an appropriate amount of OCT embedding medium to the bottom of the mold (approximately 1/4 of the depth) to prevent the tissue from sinking and directly contacting the bottom.
3) Using pre-chilled forceps on ice, gently grasp the tissue and slowly lower it into the pre-chilled OCT medium until the tissue is completely submerged.
4) Adjust the position of the tissue within the OCT, ensuring it is centered in the mold and that the target plane is parallel to the cutting surface. If embedding multiple tissues, arrange them neatly in the center of the mold and avoid overlapping. Avoid generating air bubbles during this process. If bubbles form, gently remove them using a fine needle or a 200 µl pipette tip.
5) Once the tissue is embedded, quickly transfer the mold to a -80°C freezer and place it horizontally until the OCT is completely solidified.
Note: The OCT will appear white and opaque once solidified. Keep the mold level; otherwise, the tissue may shift before the OCT sets. Flash-freezing in liquid nitrogen or liquid nitrogen with isopentane is not recommended, as excessively rapid freezing significantly increases the risk of tissue fragmentation during sectioning.
6) Wrap the embedded tissue in aluminum foil, seal it in a ziplock bag, and store it long-term in a sample box within liquid nitrogen or a -80°C freezer. For transport, ship the samples on dry ice.
Method 2: Vacuum Infiltration + OCT Embedding
1) Immerse the plant tissue in 1 ml of 0.05% Tween 20 on wet ice for 15 minutes.
2) Prepare a vacuum desiccator by removing the internal shelf (if present) and adding crushed ice to the bottom.
3) Prepare a petri dish and dispense OCT medium to about 2/3 of its volume. Place the dish in the vacuum desiccator on the ice and pre-chill for 10–30 minutes.
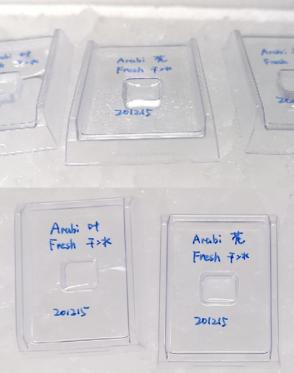
4) Label a PVC embedding mold with the sample name, date, and operator. Add an appropriate amount of OCT to the bottom of the mold (approx. 1/4 depth) to prevent the tissue from touching the bottom. Place the mold in the vacuum desiccator on the ice to pre-chill (see figure below). After use, keep the OCT bottle inverted on ice to maintain its low temperature.
5) Using forceps, gently pick up the freshly cut plant material and promptly transfer it to the pre-chilled OCT in the petri dish.
6) Close the lid of the vacuum desiccator and turn on the vacuum pump. Perform vacuum infiltration for 10 minutes. (Select the vacuum pressure according to the desiccator's specifications; 0.06 MPa is used in this protocol).
7) Gradual depressurization: Slowly rotate the air valve to release the pressure to approximately 0.04 MPa and hold for 5 minutes. Adjust the valve again to reduce the pressure to approximately 0.02 MPa and hold for 5 minutes. Finally, fully open the valve to return the pressure to zero and hold for 5 minutes.
8) Embedding: Remove the plant material from the petri dish. Adjust the tissue orientation and slowly place it into the pre-chilled OCT in the embedding mold until it is completely submerged.
9) Adjust the position of the tissue within the OCT, ensuring it is centered in the mold and that the target plane is parallel to the cutting surface. If embedding multiple tissues, arrange them neatly in the center of the mold and avoid overlapping. Avoid generating air bubbles; if any appear, gently remove them with a fine needle or a 200 µl pipette tip.
10) Once the tissue is embedded, quickly transfer the mold to a -80°C freezer and place it horizontally until the OCT is completely solidified.
Note: The OCT will appear white and opaque once solidified. Keep the mold level; otherwise, the tissue may shift before the OCT sets. Flash-freezing in liquid nitrogen or liquid nitrogen with isopentane is not recommended, as excessively rapid freezing significantly increases the risk of tissue fragmentation during sectioning.
11) Wrap the embedded tissue in aluminum foil, seal it in a ziplock bag, and store it long-term in a sample box within liquid nitrogen or a -80°C freezer. For transport, ship the samples on dry ice.
Examples of non-compliant sample submission
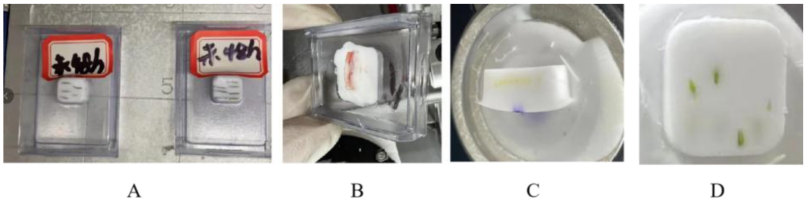
A. During embedding, the tissue was positioned too close to the bottom layer and was not fully encapsulated by the OCT. This led to RNA degradation and resulted in the sample failing quality control (QC).
B. The tissue was exposed to the air, leading to sample degradation. Additionally, the lack of OCT support on both sides of the tissue risks compromising the structural integrity of the sample during the section mounting/flattening process.
C. The tissue size is too small and fails to meet the minimum requirement of 25% coverage for gene expression analysis.
D. Multiple samples were embedded in the same block but were not aligned on the same plane. Furthermore, each tissue sample is too small and covers a limited area, which may result in a low yield of valid data for analysis.


 WeChat QR Code